Chocolate Chip Brownies
Brownies are one of the easiest treats you’ll ever make and making them from scratch isn’t hard. This chocolate chip brownies recipe includes 3 types of chocolate making them rich and delicious.
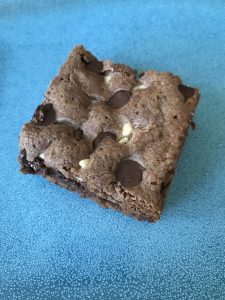
Love is in the air and your valentine is sure to fall in love with these chocolate chip brownies. After all, who doesn’t love chocolate for Valentine’s Day? I can honestly say this is THE best from-scratch brownie recipe I’ve ever made. Lots of chocolaty goodness with cocoa powder and two types of chocolate chips. I needed a snack for an end of season sports party and went looking on the Taste of Home website. These fit the bill and have now become a quick favorite in our house. The recipe calls for nuts but I omitted them since I was making them for school. Plus the chocolate chips covered the top of each pan. I used semi-sweet but you could certainly use milk if you prefer.
![]()
Want more brownie recipes?

Chocolate Chip Brownies
Chocolate Chip Brownies are perfect for potlucks or to welcome your kids home from school.

Ingredients
- 1 cup butter softened
- 3 cups sugar
- 6 eggs
- 1 tablespoon vanilla extract
- 2-1/4 cups all-purpose flour
- 1/2 cup baking cocoa
- 1 teaspoon baking powder
- 1/2 teaspoon salt
- 1 cup semisweet chocolate chips
- 1 cup vanilla or white chips
- Baking spray with flour
Instructions
- Preheat oven to 350°F. Spray two 9-inch square baking pans with a cooking spray with flour.
- In a large bowl, cream butter and sugar until light and fluffy. Add eggs and vanilla; mix well.
- In a separate bowl, combine the flour, cocoa, baking powder, and salt; gradually add to creamed mixture just until blended, being very careful to not overmix.
- Pour into both of the prepared baking pans. Sprinkle with semi-sweet and white chocolate chips. Bake at 350° for 30-35 minutes or until a toothpick inserted near the center comes out clean.
- Cool completely in the pans before cutting.

I’m a sucker for brownies and these are perfect with the added chocolate chips!
Love a good brownie, and these look delicious! I’ll have to give them a try! Clearly the solution to no nuts is more chocolate chips, I like how you think!
We love brownies! Thank you for noting the nuts can be omitted, makes it so much easier for those of us with allergies in the family.
These are definitely brownies I have to have! LOADED with chocolatey goodness…M-M-M!
Mmm I love the idea of chocolate chips in place of nuts. 🙂
I love a good brownie but am still looking for the perfect recipe to make them from scratch. This definitely looks like a contender!
Those brownies look so perfect! Brownies are my husband’s favorite so they often make a Valentines Day Appearance!
Brownies aren’t only delicious, but easy and quick. These double chocolate brownies are sure to be a big hit!
Brownies are always a winner!
Love brownies and I was just thinking about making a batch. Now I have the perfect recipe to try.
I’m on a brownie kick myself lately. Chocolate is always perfect for Valentine’s day!